
- Part 1 - Sign up for a Free Microsoft Azure Account
- Part 2 - Create an Azure App Service
- Part 3 - Install Invoice 360 Cloud on Azure App Service
- Part 4 - Download and Setup Invoice 360 Client to connect to the Cloud
The steps are similar to the Connect to Demo Cloud tutorial. - Part 5 - Setting Azure Active Directory for Authentication (Coming Soon)
Requirements
- Windows 10 (on a Desktop Device)
- Visual Studio 2015 Community Edition
- Microsoft Azure Account (See Part 1 to sign up an account for Free)
Part 1 – Sign up for a Free Microsoft Azure account
1. Signup for a free Microsoft Azure account at the following:https://azure.microsoft.com
Simply click on the “Try it now” button. You may be prompted to Login with a Microsoft Account. This can be the account you are using for your Windows device or any existing Microsoft Live/Hotmail accounts.
2. Once you have Login, you will be prompted with a Sign Up page. Enter your email and other details. Complete the Phone and Credit Card verification. Please be assured that you will not be charged anything on your Credit Card. The Azure Free Trial also comes with some free credits for you to give Azure a test drive. When you are ready, click on the “Sign Up” button.
3. Click on “Start Managing My Service” and you will be brought to your Azure Portal. On the top right hand corner, click on the button displaying your email and select the “Switch to Azure Preview Portal”. The next part of the tutorial will be on the new Azure Preview Portal. Please note that it is also possible to use the classic Azure portal. The classic portal even allows you to create Azure Mobile Services with a free 1 year 20MB SQL Server. Our tutorial, however, will focus on the new Azure portal.
Part 2 – Create an Azure App Service
This tutorial assumes you are using the new Azure Preview Portal. Please “Sign In” with your Azure account and then click on your email on the top right hand corner and select “Switch to Azure Preview Portal”. Invoice 360 Cloud is implemented with Azure App Service – Mobile App (this is previously known as Azure Mobile Service).1. Click on the “+ New” button, select “Web+Mobile” followed by “Mobile App”.
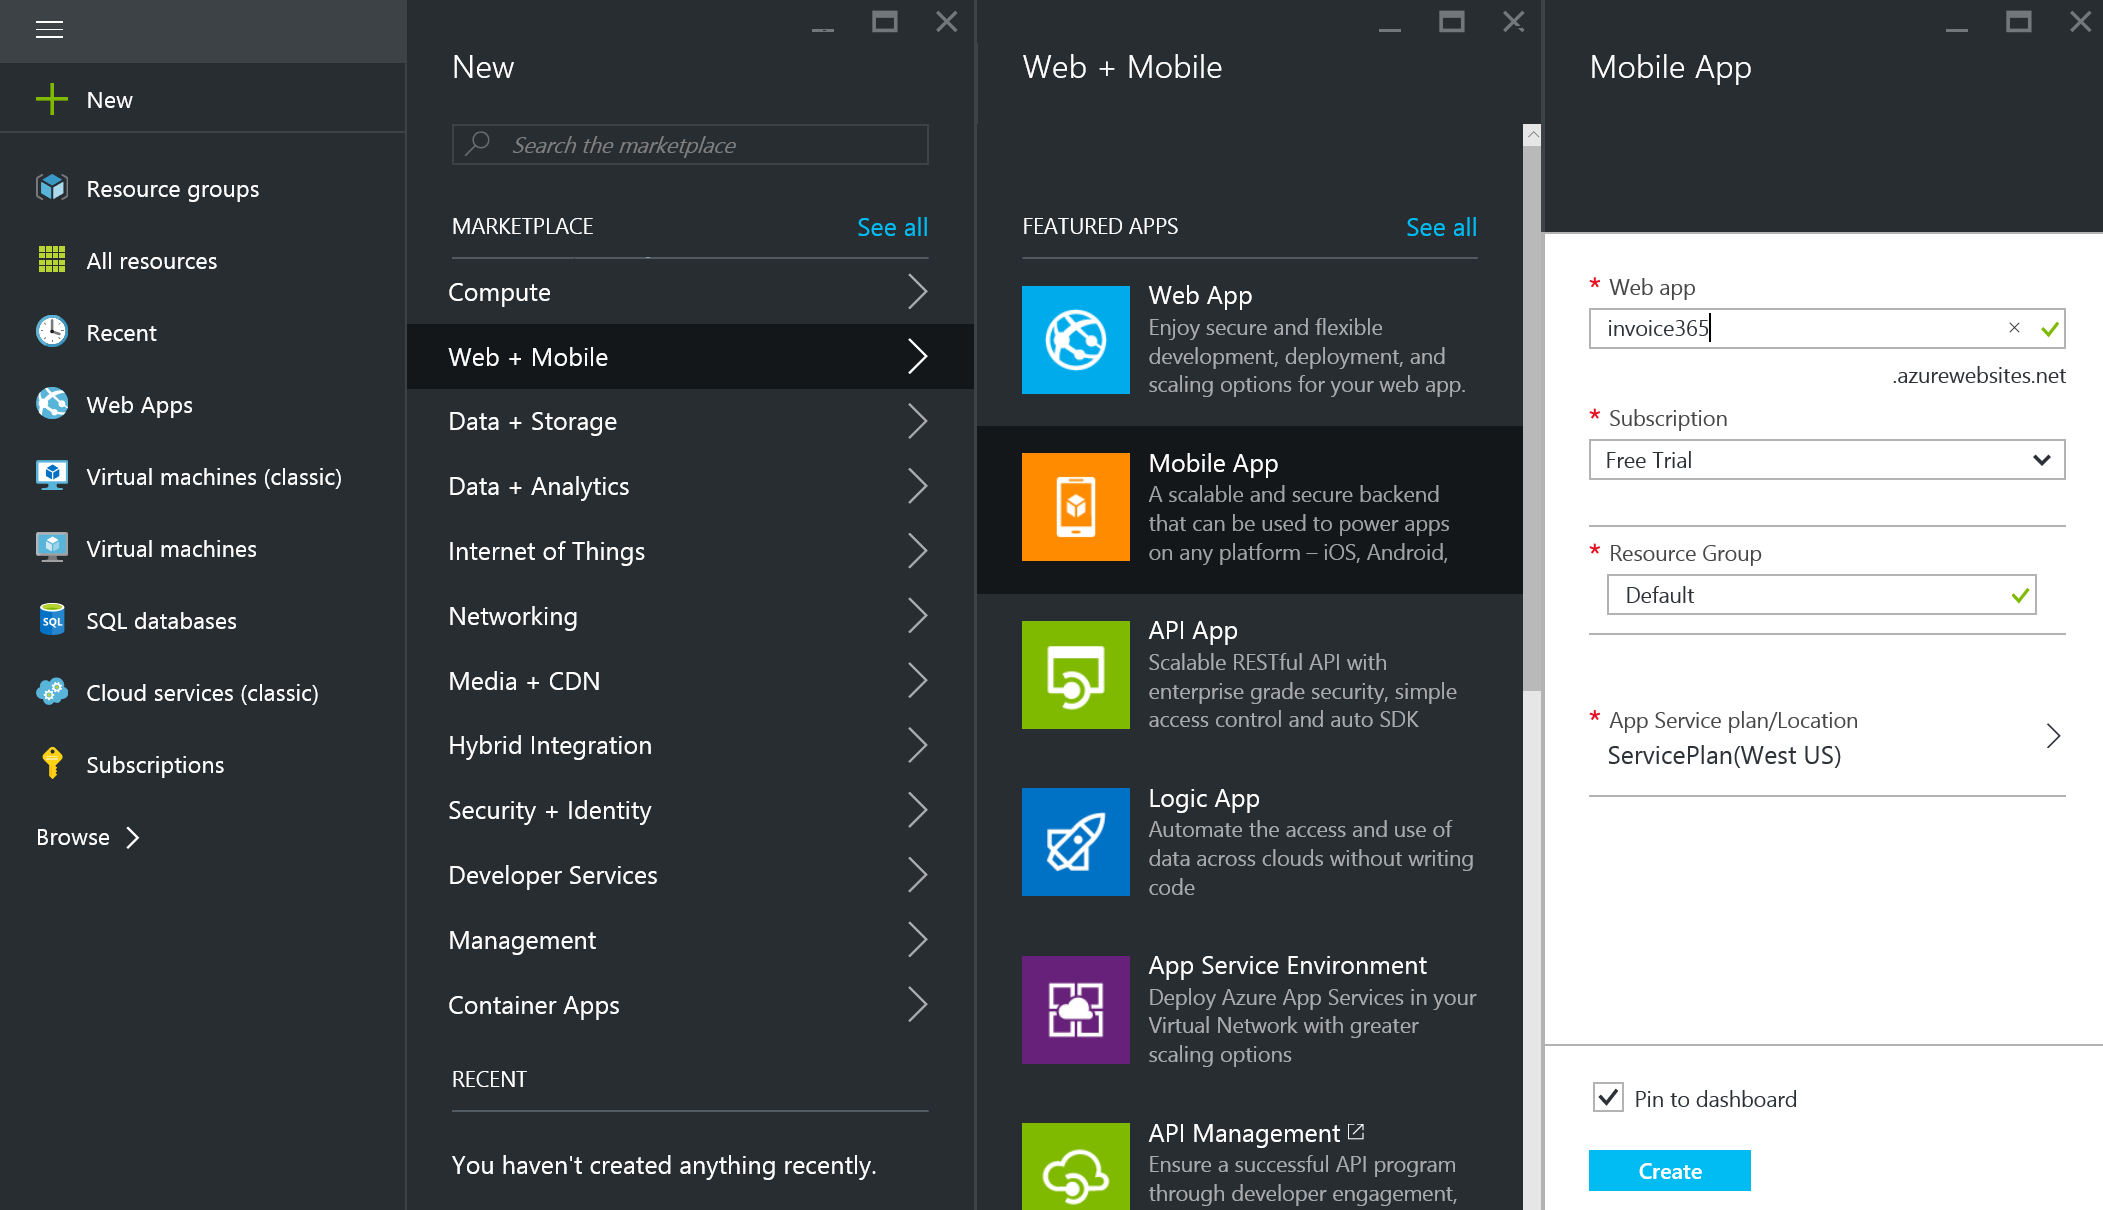
2. Enter “invoice365-myname” as the name of the “Web app” where “myname” can be any name you choose. This is because “invoice365-myname” will be used as part of the cloud URL by Azure and we will want to avoid conflicts with other users.
Next, we are going to make sure that you are deploying to the Free Tier of Azure service. There are some limitations on the amount of usage per month but it is definitely enough for you to try out Invoice 360 Cloud Sync or even power your business for quite a number of users. :)
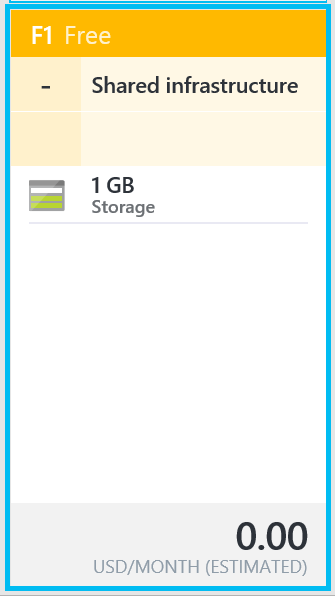
3. Click on the “App Service plan/Location” followed by “Create New”. Click on the “View All” in the “Pricing Tier” section. Select the “F1 Free” pricing tier and click on the “Select” button. Enter "FreeTier" as the "App Service plan" and click on the "Ok" button. You will only need to do this once for your Azure account.
4. Finally, back on your Mobile App section, click on the “Create” button and wait for Azure to complete the deployment of the mobile app.
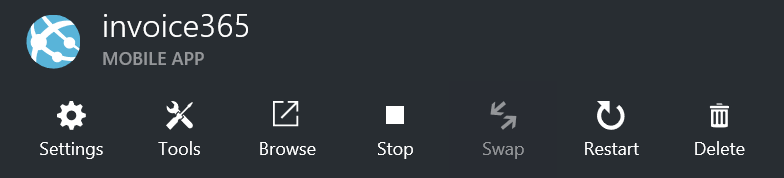
5. When the deployment is completed, the console of your Mobile App will be displayed. If not, simply click on the All Resource on the left hand side followed by the “invoice365-myname” mobile app. Make sure you see something similar to screenshot below. Click on the “Settings” button.
6. Scroll down in the Setting section and select “Data” in the “Mobile” subsection. We are going to add a SQL Server database.
7. In “Data Connections”, click on the “Add” button. In the “Add Data Connection” section, click on “SQL Database - Configure required settings” as shown below.
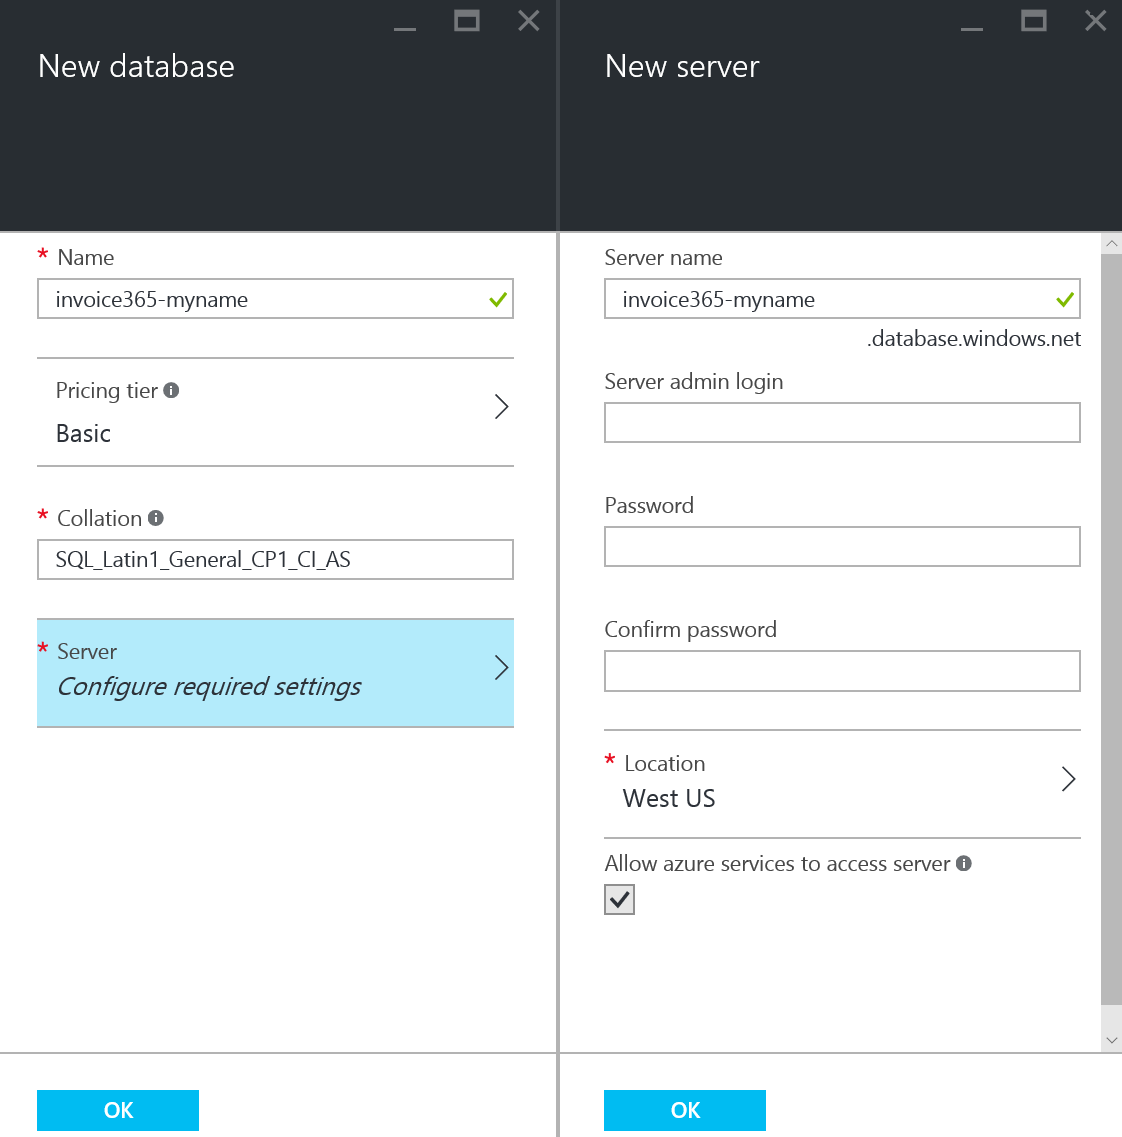
8. In the “Database” section, click on “Create a new database”. Enter “invoice365-myname” as the database name and select “Basic” (or the "Free" tier if it is available) as the pricing tier. The previous Azure portal allows you to create a free 20 MB SQL Server. Unfortunately, this may no longer be available. Please remember to shut down your Azure SQL Server when you are no longer testing to avoid charges.
9. Click on “Server - Configure required settings” in the new Database section. Enter "invoice365-myname" as the Server name and "invoice365" as the Server admin login. Enter a password and click on the "Ok" button. Click on "Ok" on the "New database" section.
10. In Add data connection "Connection string – Configure required settings", leave the name as "MS_TableConnecctionSting" and enter your database user name and password. Click on the “Ok” button in “Connection string” section followed by the “Ok” button in the “Add data connection” section. Wait for the Data Connection to be created.
11. When the Data Connection is created, click on the “Settings” button in your Mobile App
and then select “Application settings” as shown below:
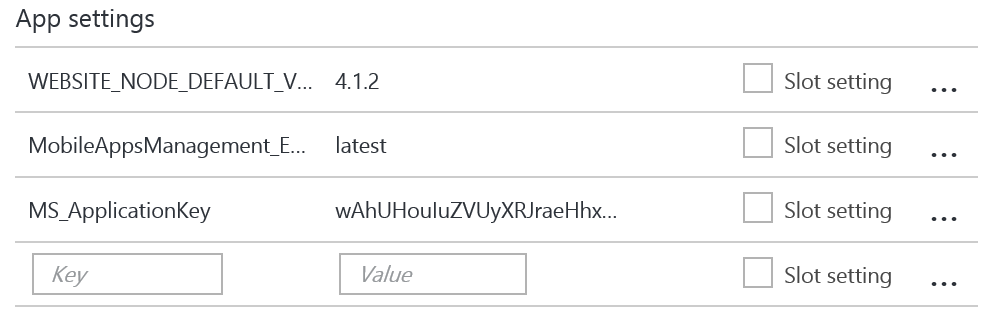
12. Scroll down to App settings and add ”MS_ApplicationKey” with a value of 32 characters.
For example,
wAhUHouIuZVUyXRJraeHhxqbgLbohI2x
Please use your own value instead of the one shown above. You will need this value for setting up the Invoice 360 client to access this Azure service. Click on the Save button and your setting should be added as shown below:
13. Finally, you can click on the “Get Publish Profile” button on the Mobile App section. Make sure you note down the location of where the profile is saved. This is typically in the Download folder of your User Account in Windows. The Publish Profile is used by Visual Studio to upload the Invoice 360 cloud to your Azure App Service.

Part 3 – Install Invoice 360 Cloud on Azure App Service
1. Download Visual Studio Community 2015 from the following:
https://www.visualstudio.com/
You may skip this step if you already have Visual Studio installed on your system.
2. Download the Invoice 360 Cloud source and launch the “invoice365.sln” solution in Visual Studio.
3. Click on the menu Build->Publish invoice365Service. Select the Profile section.

4. Click on the “Import” button and select the “invoice365.PublishSettings” from the last step of the tutorial in Part 2. After importing the settings, click on “Validate” to ensure that the connection is successful.
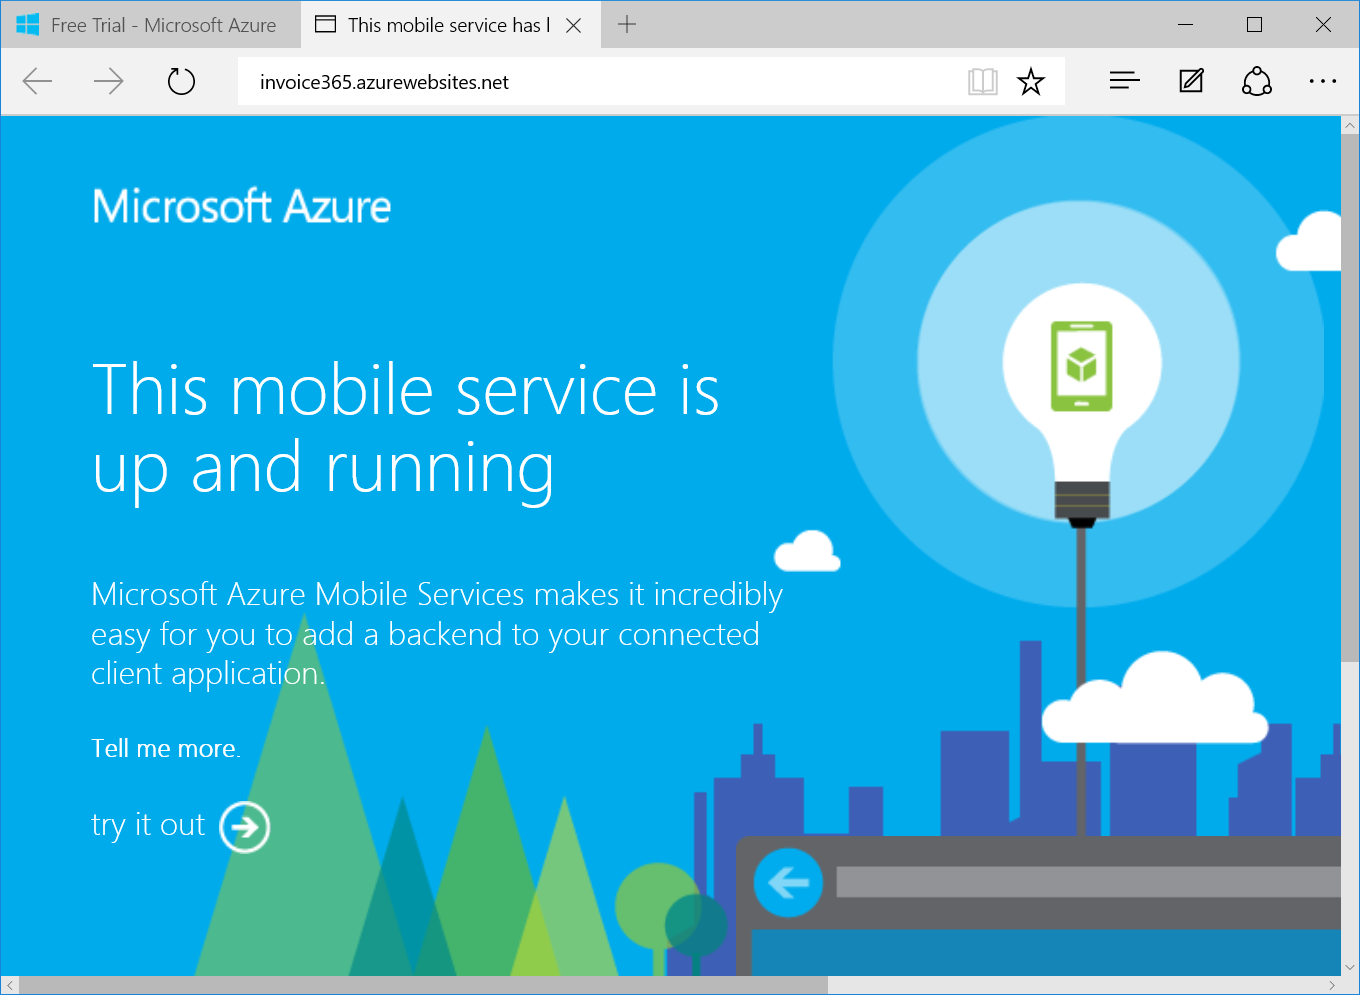
5. Click “Next” followed by “Publish”. Wait for Visual Studio to successfully deploy the project to Azure. You should see “Publish Succeeded.” in the Visual Studio Output panel. You will also notice that your Microsoft Edge browser will be launched to indicate the mobile service is up and running.
6. You are now ready to connect to your own Invoice 360 Cloud. Basically, you just need to follow the steps of the following tutorial:
Connect to Demo Cloud.
You can prepare a invoice365.cloudsettings file with the following contents:
<invoice365Data xmlns:xsd="https://www.w3.org/2001/XMLSchema"
xmlns:xsi="https://www.w3.org/2001/XMLSchema-instance">
<invoice365
appUrl="https://invoice365-myname.azurewebsites.net"
appID="wAhUHouIuZVUyXRJraeHhxqbgLbohI2x"
clientID=""
authority=""
resourceURI=""
action="init"
/>
</invoice365Data>
The appUrl is the web address displayed in the browser of the previous step. Please remember to change “myname” to what you have specified previously. The appID is the value you used for “MS_ApplicationKey” in Part 2 (Step 12) of this tutorial. When prompted to Setup your Invoice 360 Client app, simply choose the above .cloudsettings file.